Ad1

Friday 23 May 2014

Matar Paneer (Cottage cheese with peas in spicy gravy)


Today my post is dedicated to my mummy , she makes the world's best Matar Paneer (I am sure every child feels that). She is very down to earth lady, not into much sho-sha, very quite & calm, not very demanding. We two had a great bonding just like best friends, used fight a lot and then roothna-manana :)))), being an eldest child she always used to involve me in her decisions, we used to go for shopping together on my Scooty , Ahhhhhh badly missing those days :(((
She is not very much into cooking, cooks just the daily food but whatever she cooks just taste heavenly good. She only prepare two types of paneer curries, one is Matar Paneer & the other is Palak paneer. Prepares her own style chatpata types. Missing her so much past few days, so just thought to prepare Matar Paneer just the way she does and I won't say that its completely ditto as she has her magical touch in it, but yes to quite an extend ye I did it!!!!!!!!!!!


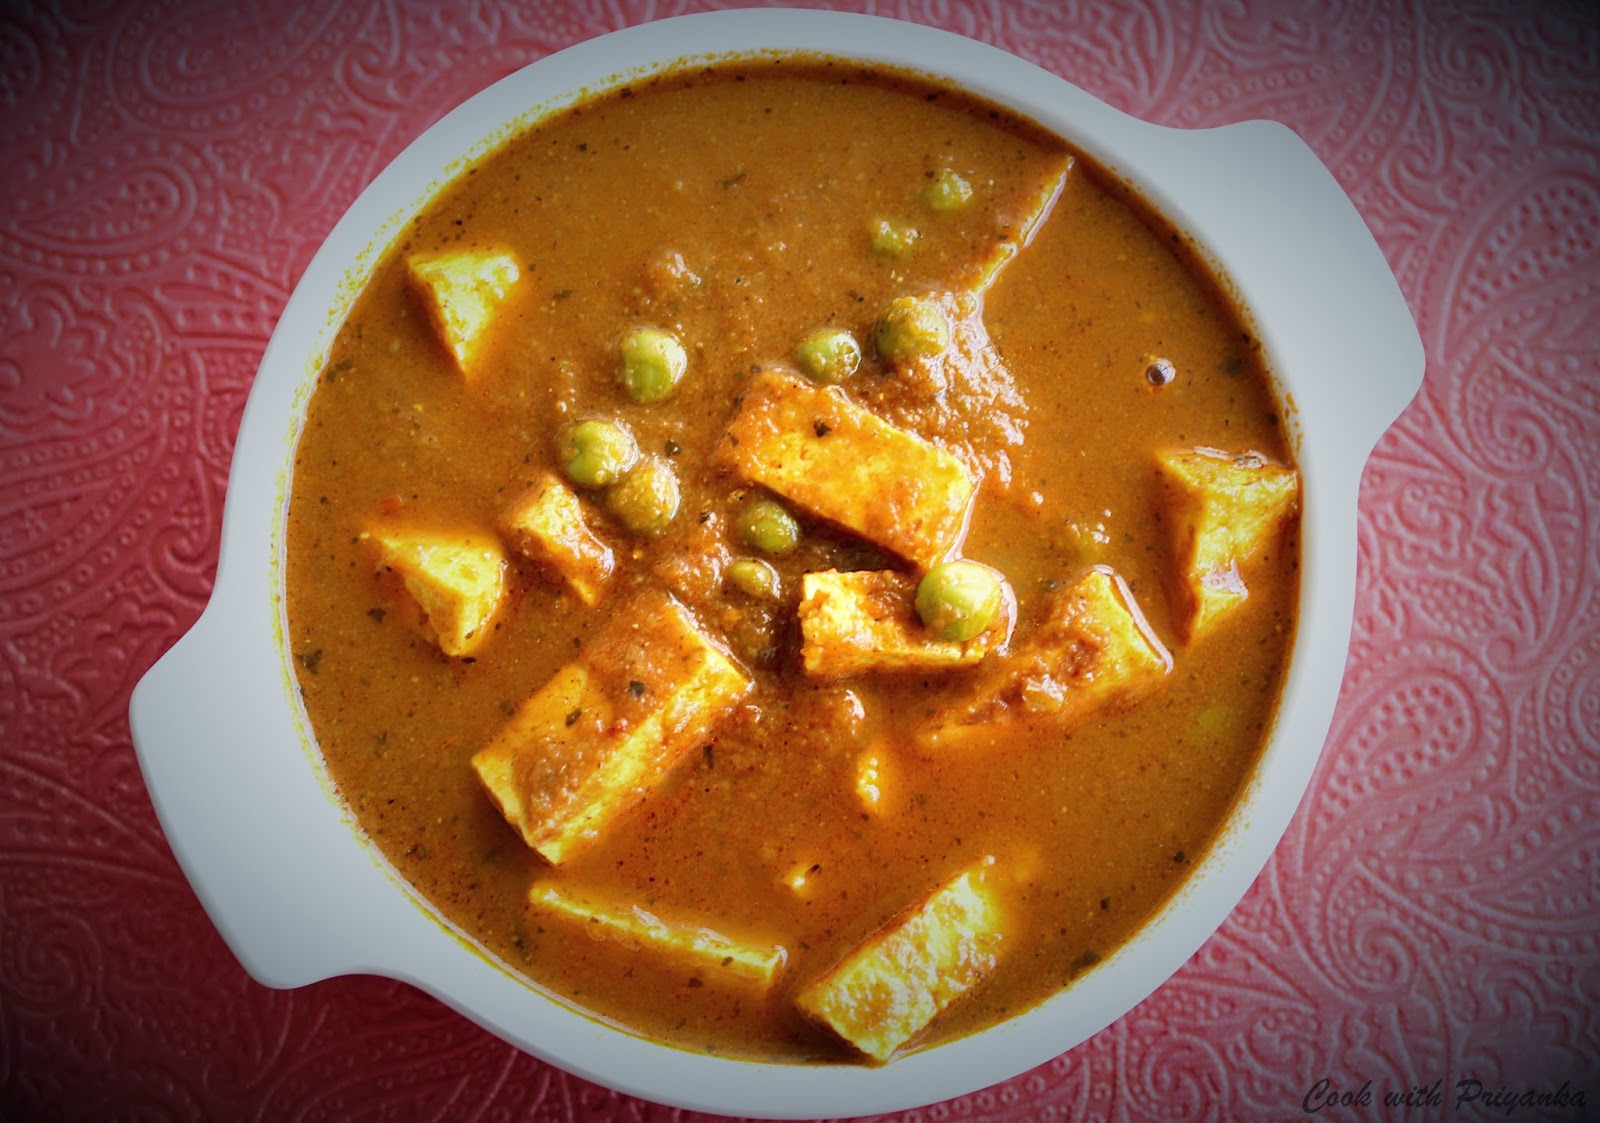
Usually Matar paneer is a very common recipe, but I am sure the recipe might vary some or the other way. I am sharing my Mom's recipe and would love to here the way you make yours :)
Paneer is my homemade, for the recipe click here.

Ingredients :
  • Paneer/cottage cheese - 250 gms
  • Peas/Matar - 1 cup (I used frozen)
  • Onions - 2 medium sized (grated)
  • Ginger Paste - 1 tsp
  • Garlic Paste - 1 tsp
  • Tomatoes - 2 medium sized (grated/pureed)
  • Cloves - 4
  • Bay leaf - 2
  • Crushed Black peppercorns -  1/2 tsp
  • Whole red chili - 1
  • Turmeric powder - 1/2 tsp
  • Red chili powder - 1/2 tsp
  • Kashmiri red chili powder - 1/2 tsp (for color)
  • Garam Masala -1/2 tsp
  • Coriander Powder - 1 tbsp
  • Dried Fenugreek leaves/Kasuri Methi - 1 tsp
  • Salt as per the taste
  • Oil - 2 tbsps
  • Butter - 1 tbsp

Method :
  • Heat oil in a pan, add cubed paneer pieces and fry till lightly colored. Keep aside.
  • Now in the same pan with remaining oil add butter, cloves, bay leaves, whole red chili and turmeric powder and saute a little. Now add ginger & garlic paste and fry till all the rawness is gone.
  • Now add the grated onions and crushed peppercorns and fry till you get a nice golden brown color and the oil oozes out. 
  • Now add the powdered spices except kasuri methi and saute until oil separates.
  • Then add in the tomato puree and cook. Once done add peas (as I used frozen peas, hence i didn't cook them, but if you are using fresh peas then boil them prior with a generous pinch of salt), and later add 1 cup of boiling water.
  • Add Garam masala, Kasuri methi and paneer. Cook on medium flame for 5 minutes and garnish with fresh coriander leaves.
Enjoy with Chapati, nan, Paratha, rice :)

Please do share your experiences and feedback with me in the below section of comments or on my Facebook page. I too have a You Tube channel please do visit for all the video recipes. All the links mentioned below :) 


Thanks & Happy cooking
Priyanka


Wednesday 21 May 2014

Goan Style Egg curry (Coconut based gravy)


Hi all, today I am very excited as I am going to do a guest post on my blog. This is my very first guest post and I am so happy that it's none other than Mr.Sushant Varma (My husband). He is a very good cook and more important - loves to cook. He is an IT professional and doesn't get much time, but whenever he is free he does it, specially on weekends. Last weekend we went together for a group meet of Chef at Large, its one of the biggest foodie group on Facebook having more than 32000 members. There we had a secret ingredient swap (Every member got an ingredient, which was not revealed to other members, then they were shuffled and distributed back). Me and Sushant both are the members, hence we both participated in it. He got a fresh whole coconut, with which he had to prepare a dish. 


So he decided to prepare a Goan egg curry. We prepare egg curry frequently but the normal way its made, never tried it before but must say will be switching to this curry now more often. Won't be taking much time and straight away directing to Sushant.

"When I left home for my further studies, had various choices with food and had no idea about cooking. I went to New Delhi and had almost same options on most of the food joints with the same kind of taste. As very well said that “Necessity is the mother of invention” (for me cooking was an invention). I started cooking, but with a big question mark. Tried and failed many a times but somehow learnt the basic stuff. Then went to Mumbai for work and spent almost 3 years there. Great place with great people must say. There I learnt lot many varieties and got to know a lot about Goan food from one of my Goan friend. When cooking converted to passion from necessity never knew. But as an IT professional it’s so tough to take out time and continue our passion. I got married and that too with a foodie. Bas phir kya tha the journey began. Still I don’t get a lot of time, but can see my passion through my wife’s eye. So after a very long story here is the Recipe."
 
Recipe is for 2 portions, you can always increase the ratio as per the people.

Ingredients-

  • Eggs : 4 nos
  • Onions : 2 medium
  • Garlic : 4-5 cloves
  • Ginger : 1” piece
  • Fresh Coconut : ½ cup (remove the brown part)
  • Coconut milk : ¼ cup
  • Tomato paste : 1 tomato (I used concentrated hence 1 tbsp)
  • Tamarind pulp : 1 tsp
  • Whole red Chili : 1
  • Cumin seeds : 1 tsp
  • Coriander seeds : 1 tbsp
  • Turmeric Powder : ¼ tsp
  • Red chili powder : ½ tsp
  • Garam Masala : ½ tsp
  • Salt : As per the taste
  • Coconut oil – 2 tbsps (You can take any vegetable oil too)
Method -
  • Roughly chop ginger, garlic, onions and coconut.
  • Boil eggs
  • Heat oil in a pan. Once hot, add whole red chilies, cumin seeds, coriander seeds and then garlic and ginger. Once done, add onions and sauté till they change the color to pink. Add coconut and again sauté till you get nice golden brown color. Add the powdered spices and tomato paste and fry until oil oozes out. Add tamarind pulp and stir. Now cool down the mixture and blend to a paste. In the same pan, pour it back and cook. Add coconut milk and stir continuously till a boil comes. Add salt and boiling water (if required). You can adjust the gravy consistency by adding water. Now add the boiled eggs cut into two and cover the pan and simmer for 5 minutes. Garnish it with green coriander. Enjoy with Chapati, or steam rice.
Thanks
Sushant


Thanks a lot Sushant for sharing this wonderful recipe with us :)) 

Please do share your experiences and feedback with me in the below section of comments or on my Facebook page. I too have a You Tube channel please do visit for all the video recipes. All the links mentioned below :) 

Tuesday 20 May 2014

Banana & Walnut Cake (Eggless)


Hi all, recently upgraded to a DSLR (finally!!!!!!) and also crossed my 1500 likes on Facebook page, so double celebrations time. Hence thought to prepare some sweet and therefore prepared Banana & walnut cake. Being baking a new passion, I always try to get more eggless recipes as these can be followed by both non-vegetarian and vegetarian friends :))))


Its just two days I got my new camera and working on it. Goshh!!!!!!! its so difficult & complicated to work with, but I am pretty sure will overcome it and share upgraded pics soon with you guys.


Talking about the cake now ;), its supermoist as I used oil and yoghurt, Its light & spongy. Full of flavours of Banana, cinnamon. As coffee enhances the flavor of chocolate in the same manner cinnamon also enhances the flavour of banana. I have used the over-ripped bananas here (those which have large black spots on the skin). Actually these bananas are more sweeter and gives very nice flavour to cakes, smoothies. So no more throwing of those dark colored bananas :)). Walnuts & bananas are a great combination together, walnut gives a very nice crunch to the cake. So guys with so many goodness why are we waiting then ????? Lets quickly run through the ingredients following the method :))))

Video :-


Ingredients :
I have divided the ingredients list in two parts- the dry & wet ingredients. This way it will be easy for you to follow.
Dry ingredients: 
  • All Purpose flour/Maida/Plain flour - 1 cup
  • Baking Powder - 1 tsp
  • Baking Soda - 1/2 tsp
  • Cinnamon Powder - 1/4 tsp
  • Salt - a generous pinch
  • Walnuts - 1/4 cup (roughly chopped)
Wet ingredients :

  • Brown sugar - 1/2 cup
  • White granulated sugar - 2 tbsps
  • Thick Yogurt - 1/4 cup (at room temperature)
  • Vegetable Oil - 1/4 cup 
  • Banana - 2 medium sized (overripped)
  • Vanilla Essence - 1 tsp (optional- I didn't add it)
Method :
  • First preheat the oven at 180°C. Grease & flour the baking tin, if you want, line with parchment paper/Butter paper.
  • Sieve the dry ingredients together atleast 3 times and keep aside, this give more aeration in the flour and helps in making the cake light.
  • Now mix in a couple of tbsps of flour with the walnuts and coat well, this will prevent sinking walnuts. Keep aside.
  • In other bowl mix oil + sugar + yogurt + Vanilla essence (if adding). Also add mashed bananas. After they are well combined add the dry ingredients and fold in gently. Also add the flour coated walnuts.
  • Pour the batter in tin.
  • Bake it on the middle rack for 40-50 mins or unless a tooth pick inserted in the cake comes out clean. Mine took exactly 45 minutes. But keep checking after 35 minutes as every oven vary as per the power :)
  • When done, take it out and give a rest of 2 minutes in the tin, then demold and cool on a cooling rack.
  • Once completely cooled, cut into slices and these can be stored in an air tight container for 3-4 days. You can also enjoy it my way - warm slice with vanilla ice cream :)) 
Note : 
  • If you don't have brown sugar simply replace it with white one. 
  • You can omit cinnamon if that's not your taste. You can add green cardamom powder instead.
  • You can adjust the amount of sugar as per the sweetness of bananas or your taste.
  • Also you can adjust the walnuts quantity as per the liking, or completely omit it. 
Please do share your experiences and feedback with me in the below section of comments or on my Facebook page. I too have a You Tube channel please do visit for all the video recipes. All the links mentioned below :) 


Thanks & Happy Baking
Priyanka :)))

Sunday 18 May 2014

Coconut Macaroons


Coconut Macaroons are closer to a cookie than its meringue cousin, and is equally sweet. They have a nice crust and chewy inside. I heard a lot about Coconut Macaroons and always thought that they are very fancy and can only be bought from a bakery. Never ever thought to prepare them at home. 

 
Once I was going through a recipe of Ina Garten and found it to be not so difficult and quick to make. The original recipe contains Condensed Milk + Coconut + Egg whites, but making some changes I totally omitted the Condensed milk part and made them with sugar. Few recipes also add almond meal to it. There are many methods to prepare them. Few beat the egg whites to the stiff peaks and then fold in the coconut and sugar and many more. But I got a very easy and simple way to prepare it for you guys. There are various varieties of coconut macaroons these days - like chocolate, nuts etc.
So lets quickly see the ingredients followed by the method.

Ingredients :
  • Castor Sugar - 1 cup
  • Dessicated Coconut - 2 + 1/2 cups
  • Egg whites - 4 egg whites (large eggs, if medium then 5)

Method :
  • In a  big bowl whisk sugar & egg whites just to mix well.
  • Now add in the coconut and again mix.
  • Transfer the mixture to a pan on medium to low flame and continuously stir it. (Make sure to stir continuously as if not then the egg might cook to a scrambled egg and we don't want that)
  • After sometime you will observe that the moisture has dried out a bit. Just close the flame and let the mixture rest for 5 minutes. (make sure that the mixture is not too runny, if yes then cook it for some more time)
  • Now take a plastic sheet piping bag or make your own, fill it with the mixture, cut a little big hole. 
  • Pipe on to a baking tray lined with butter paper.
    Bake it in a preheated oven at 160 ° C for 20-25 minutes or unless they get a nice golden brown color.
  • Once done, take them out and let them sit in the baking tray for 5 minutes. Then transfer to a cooling rack and let them cool completely.
Once cooled, store them into an air tight container and enjoy !!!!!

Note :
They are very easy to prepare, but few things have to be kept in mind -
While cooking the mixture, stirring continuously is very important
While baking, once they start changing color keep an eye, as they might get a very dark color soon.

Do share your experiences and feedback with me in the below section of comments or on my Facebook page. I too have a You Tube channel please do visit for all the video recipes. All the links mentioned below :) 


Thanks & Happy Baking
Priyanka :)


Friday 16 May 2014

Oatmeal, raisins & choco chips cookies (Eggless & with eggs both version)


Oatmeal cookies are not new in our home as its liked by everyone hence an all time favourite snack for our family. Secondly its healthy too :). I have prepared them with & without eggs and frankly speaking didn't find much difference. They are crunchy outside and chewy inside. Have a nice buttery flavour with a sweetness of raisins & chocolate. I also add cinnamon powder to it as its my one of the favourite flavours, its totally optional but I must admit that it takes cookies to the next level :))))


Tomorrow I am planning to meet one of my foodie friend, so just thought to bake something for him. Made few goodies and will upload soon. The one thing which I thought to prepare first were these, as I am pretty sure it will be loved :). Presenting a food goodie to a foodie friend is quite tough na........But making my fingers crossed, I have packed them. 


They are very easy to prepare and have a longer shelflife. These can be stored in an airtight containers for a longer time. Having one cookie with a cup of milk is very healthy and believe me kids just love it. Once I prepared it for my niece and she became crazy for them, used to have them in her breakfast without any fuss, she is just 4 :))))). So lets quickly run through the ingredients following the method :)

I am also posting here a video for an eggless version, so all my vegetarian friends can see it. I didn't add chocolate chips in this version, if you like you can add 1/4 cup of chocolate chips too. 

Ingredients :
  • Rolled oats - 1 + 1/2 cup (Old fashioned or quick any can be used)
  • All purpose flour/Maida/ Plain flour - 3/4 cup
  • Light Brown Sugar - 1/2 cup packed
  • Castor sugar - 1/4 cup
  • Butter - 1/2 cup (at room temperature)
  • Egg - 1 nos 
  • Vanilla essence - 1/2 tsp
  • Baking Soda - 1/2 tsp
  • Salt - 1/2 tsp
  • Cinnamon Powder - 1/4 tsp (optional)
  • Raisins - 1/2 cup
  • Choco chips - 1/4 cup
Method :
  • Preheat your oven at 180 ° C/350 ° F
  • In a big bowl beat butter till fluffy & light. 
  • Now add both the sugars and continue beating till mixed well and the mixture becomes fluffy.
  • Now add one egg and vanilla essence.
  • In a separate bowl sift & whisk all the dry ingredients - All purpose flour + Baking Soda + Cinnamon powder + Salt.
  • Fold in the dry ingredients to the wet (butter mixture)
  • Incorporate oats + raisins + choco chips.
  • Place the cookies with the help of ice cream scoop or spoons on the baking tray lined with parchment paper/aluminum foil.
  • Bake them on the middle shelf for 17-20 minutes. If you like your cookies to be more chewer and not very much crispy then bake them till 15 minutes only. 
  • Take them out, let them rest for 5 minutes on the baking sheet. Later transfer them to a cooling rack and let them completely cool for atleast an hour. Once cooled store them in an air tight jar.
Note : 
  • I have used brown sugar, but if its not available then you can use normal white granulated sugar too. If you can grind the sugar then that will also work great.
  • Once baked, cookies tend to get bit harder when comes in contact with air. So don't panic if they are soft on touching after 15-17 minutes.
  • Adding raisins & choco chips is totally up to your choice.
Enjoy with your family & friends :)


Do share your experiences and feedback with me in the below section of comments or on my Facebook page. I too have a You Tube channel please do visit for all the video recipes. All the links mentioned below :)


Thanks & Happy Baking 
Priyanka :) 

Thursday 15 May 2014

Baked Papdi/Baked crackers

These days I am on a mission of healthy snacks which have a longer shelf life and can be enjoyed guilt free. In our Indian homes, the most famous snacks are mathri, but........they have huge amount of ghee in it :((((, I can't even imagine the number of calories they have!!!!!. But at the same time they are so so addictive that one can't resist to have just one :))).  This is human tendency I believe, the food which is unhealthy is loved most and we always don't prefer healthy ones :). One fine day we friends were discussing about the same on a group chat, found that most of the people have green tea but just as a sake to have it and never preferred it above their proper Indian ginger tea :))). But at the same time there are many more who love to have it, I am among them.

I have a habit of munching something after every 2-3 three hours, need some biscuits, flakes or anything. If I have anything which is high in calories and have high fat content, then I am gone. So therefore I planned to have healthy snacks with full of flavours. Sushant's colleagues demanded for some Indian samosas (proper aloo one). So I prepared in a very large batch and was left with some dough. My mother always used to fry mathris from the left over dough and I am sure you all too do the same thing :)))). But I gave a new twist to it and just baked them and voila the results were outstanding - crisp, crunchy and light. Goes amazingly good with a cup of tea. As it was from the samosa dough hence made from Maida/ All purpose flour, but next batch I will prepare from whole wheat flour and soon share the results. So here is the recipe, its quite simple and easy to prepare, hope you all will like it too.

Ingredients :
  • All purpose flour - 1 cup
  • Vegetable oil - 2 tbsps (I used Olive oil)
  • Carom seeds/Ajwain - 1 tsp
  • Salt as per the taste
  • Warm water - 1/4 cup (to knead the dough)

Method :
  • Mix all the ingredients (except water) in a big bowl. 
  • Now add little by little water, we need to have a stiff dough (not very soft). You can always adjust the amount of water. Once done cover and allow it to rest for 30 minutes.
  • Now divide the dough into two parts and roll like thin chapati. With the help of a cookie cutter or a bottle's cap cut into desire shape. Place them on baking tray, lined with butter paper/aluminum foil.
  • Bake them on the middle rack at 180 ° C for about 18-20 minutes, do flip them in between. Mine were done in exactly 20 minutes but every oven varies in terms of power hence would advise to keep an eye.
  • Also if u want dark brown color, then put them on broil (on the top rack with temperature 220 ° C) for just 30 sec. But make sure that you don't move from there as they might burn.
  • Take them out from the oven, let them rest in baking tray for 5 minutes and then transfer on to a cooling rack. Once completely cooled store them in an air tight jars. These will remain good for a month.
  • Now prepare a nice cup of tea and have them with a cute smile :)
Note : You can add flavours of your own choice like - chili flakes, kasuri methi/Dried fenugreek leaves, Italian herbs too if you like :)


Do share your experiences and feedback with me in the below section of comments or on my Facebook page. I too have a You Tube channel please do visit for all the video recipes. All the links mentioned below :)


Enjoy making them :)

Thanks & Happy Baking
Priyanka :)


Friday 2 May 2014

Quick Roasted Murmure/ Laiya/Lava - Low cal (Roasted Puffed Rice)


It was raining here in London since morning and I was craving for some adrak wali chai (Ginger Tea), I love it and can have 4-5 cups in a day, though I have started controlling my tea and switched to green tea more :))). 


We always have some snacks with evening tea, I am sure you all too. Usually in my Native Town, we all sit together and have evening tea with lots of fried snacks and no one is worried about the weight gain at all. I still remember during my schooling whenever I had my exams, mummy used to make a big dabba of murmure namkeen. She used to roast it in batches with lots of oil. I loved it and had it in huge quantities, later realized the unhealthy part. After marriage I started roasting them in a nonstick pan with no oil, but the results were not that good. Then one day I made this namkeen in microwave and voila the results were just mind blowing. My mother didn't realize that they were made in 1 tsp of oil (that too for only tadka/tampering). Its supereasy and quick to make too. I also prepare flattened rice/chivra namkeen almost in the same manner and pretty sure that you all will love it :))).
Here is the link for roasted chivra namkeen - Click here

Ingredients :
  • Laiyya/Murmure/Puffed rice - 2 cups
  • Peanuts - 3/4 cup
  • Turmeric powder - 1/2 tsp
  • Black salt - 1 tsp
  • Green chilies - 3 medium sized (finally chopped)
  • Curry leaves - 15 (appx)
  • Sugar - 1 tsp (optional)
  • Salt - if needed (I didn't add)
  • Oil - 1 tsp
Method:
  • Take a microwavable big bowl, dry roast murmure in microwave for 2-3 minutes on high (do stir twice in between) and keep aside. Following the same procedure roast peanuts also for a couple of minutes or unless nicely done.
  • In the same bowl, heat oil for 2 minutes in microwave. Now add curry leaves, green chilies turmeric powder, mix well and again microwave it for a min.
  • Finally add black salt and sugar, mix (If you are adding plain salt, add at this point of time)
  • Now add roasted peanuts and murmure, mix very well.
  • Cool the mixture completely and store it in an airtight container for a month and enjoy with tea, coffee or cold drink. But I am sure it won't last for such long :)))
Note : 
  • You can add some dry fruits like coconut, raisins, almonds etc.
  • Adjust the quantity of peanuts, green chilies & salt as per the taste. You can also add red chili powder while tampering, and omit green chilies.
Do share your experiences and feedback with me in the below section of comments or on my Facebook page. I too have a You Tube channel please do visit for all the video recipes. All the links mentioned below :)


Thanks & Happy Healthy Cooking
Priyanka :)))