Ad1

Monday 31 March 2014

Cheese Burst Pizza (Domino's Style)


Pizzas doesn't need any introductions. Most of us like it rather just crazy about it. Its special as its loaded with cheese n in cheese burst......what to say???. We have different choices for the pizzas, some like thin crust some like deep pan, some love cheese bursts. I m in the last category, just love cheese burst pizza. Cheese oozing out from every where...yummy!!!!! As pizzas are all time favorites at the same time quite heavy on our pockets even. Trust me guys if we are preparing them at home, really cost is cut down a lot. Therefore I tried to imitate the Dominos recipe. I won't say that its exactly same.....but yes far better. Just try it out, I am sure you will love it :). So here i have the a recipe for you all of a cheese burst pizza.

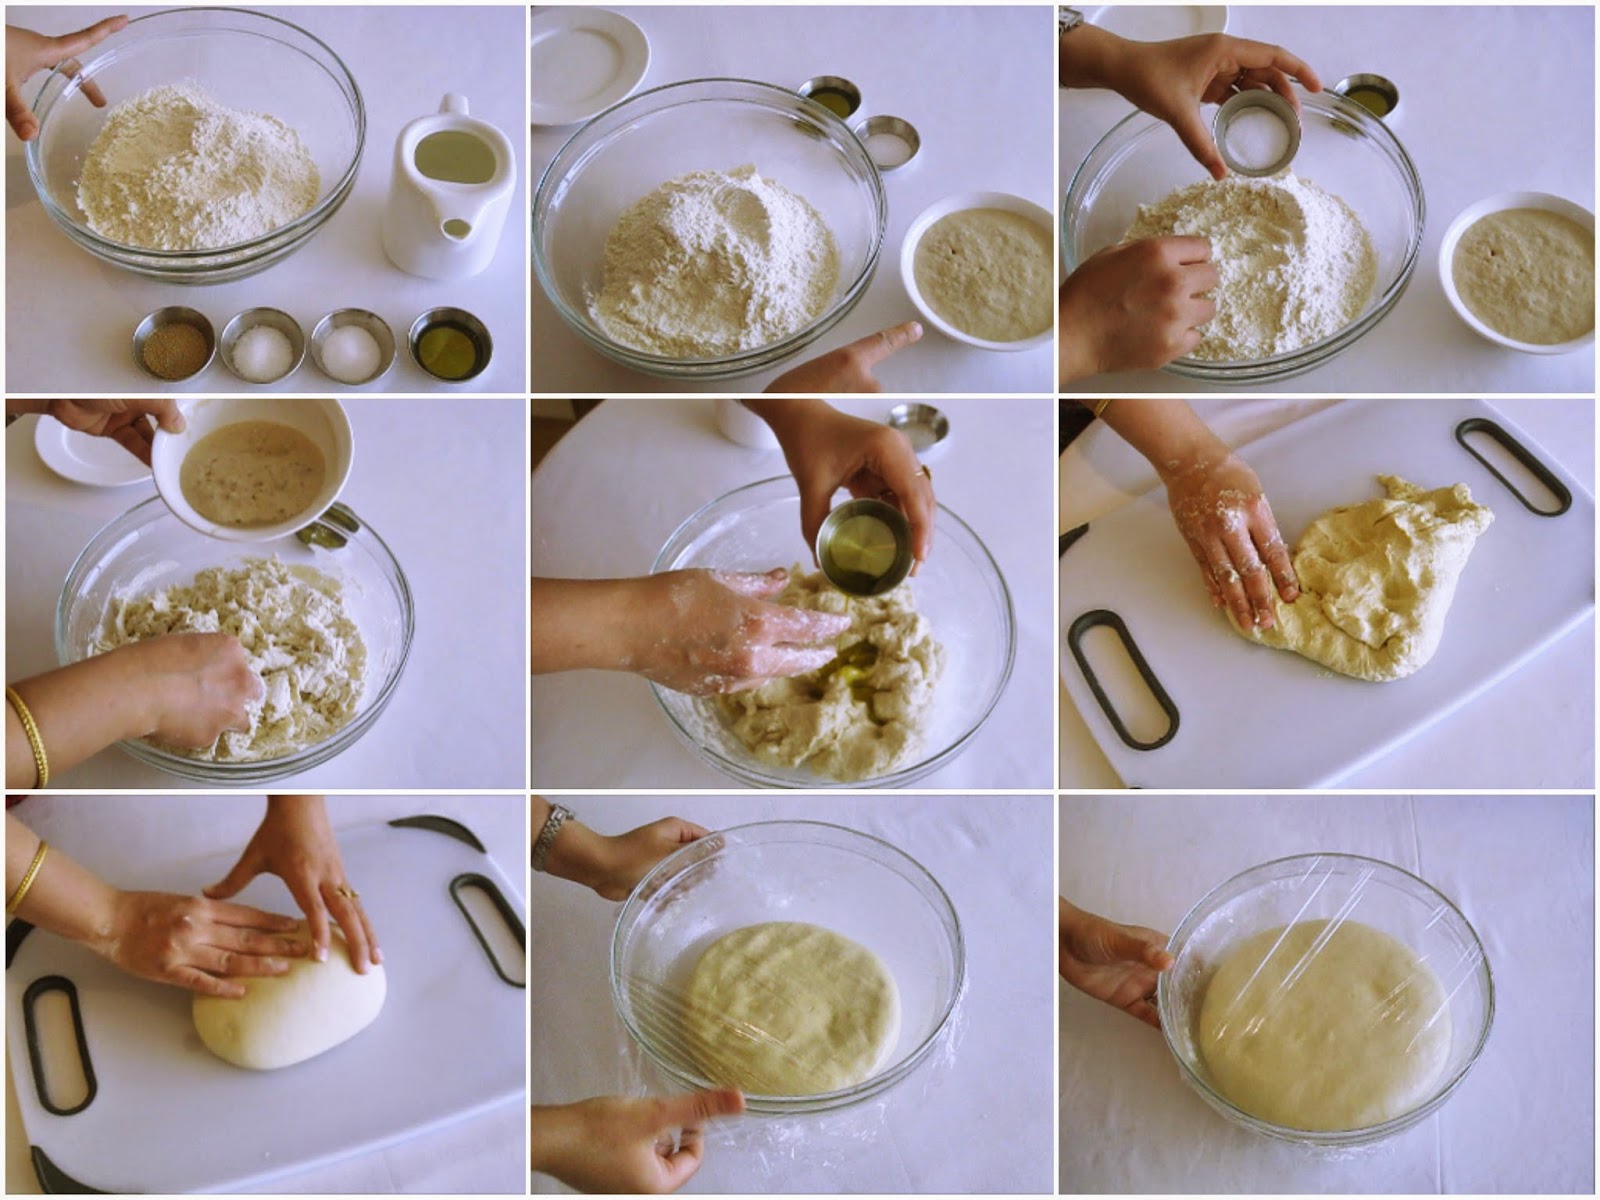
I have already posted the recipe for the Pizza dough and Homemade pizza sauce. Please click on the links for the detailed recipes.

Ingredients (For Medium size pizza)
  • Pizza dough (made from 1 cup of Plain flour)
  • Cheese : 250 grams (I used mature cheddar)
  • Pizza sauce : 3-4 tbsps
  • Mixed herbs : 1-1/2 tsp
  • Chili flakes : 1-1/2 tsp
  • Salt : 1/4 tsp
  • Black pepper : 1/4 tsp
  • Olive oil/Veg oil : 1 tbsp
Toppings :
  • Coloured bell peppers
  • Mushrooms
  • Sweetcorn/babycorns
  • Tomatoes
  • Onions
Note : There is no hard & fast rule for the toppings, sauce, seasonings or the cheese. The veggies and their quantities totally depend on the personal preferences.  
Cheese variety is up to your preference.

Method 
  • Preheat the oven at 210 degree Celsius.
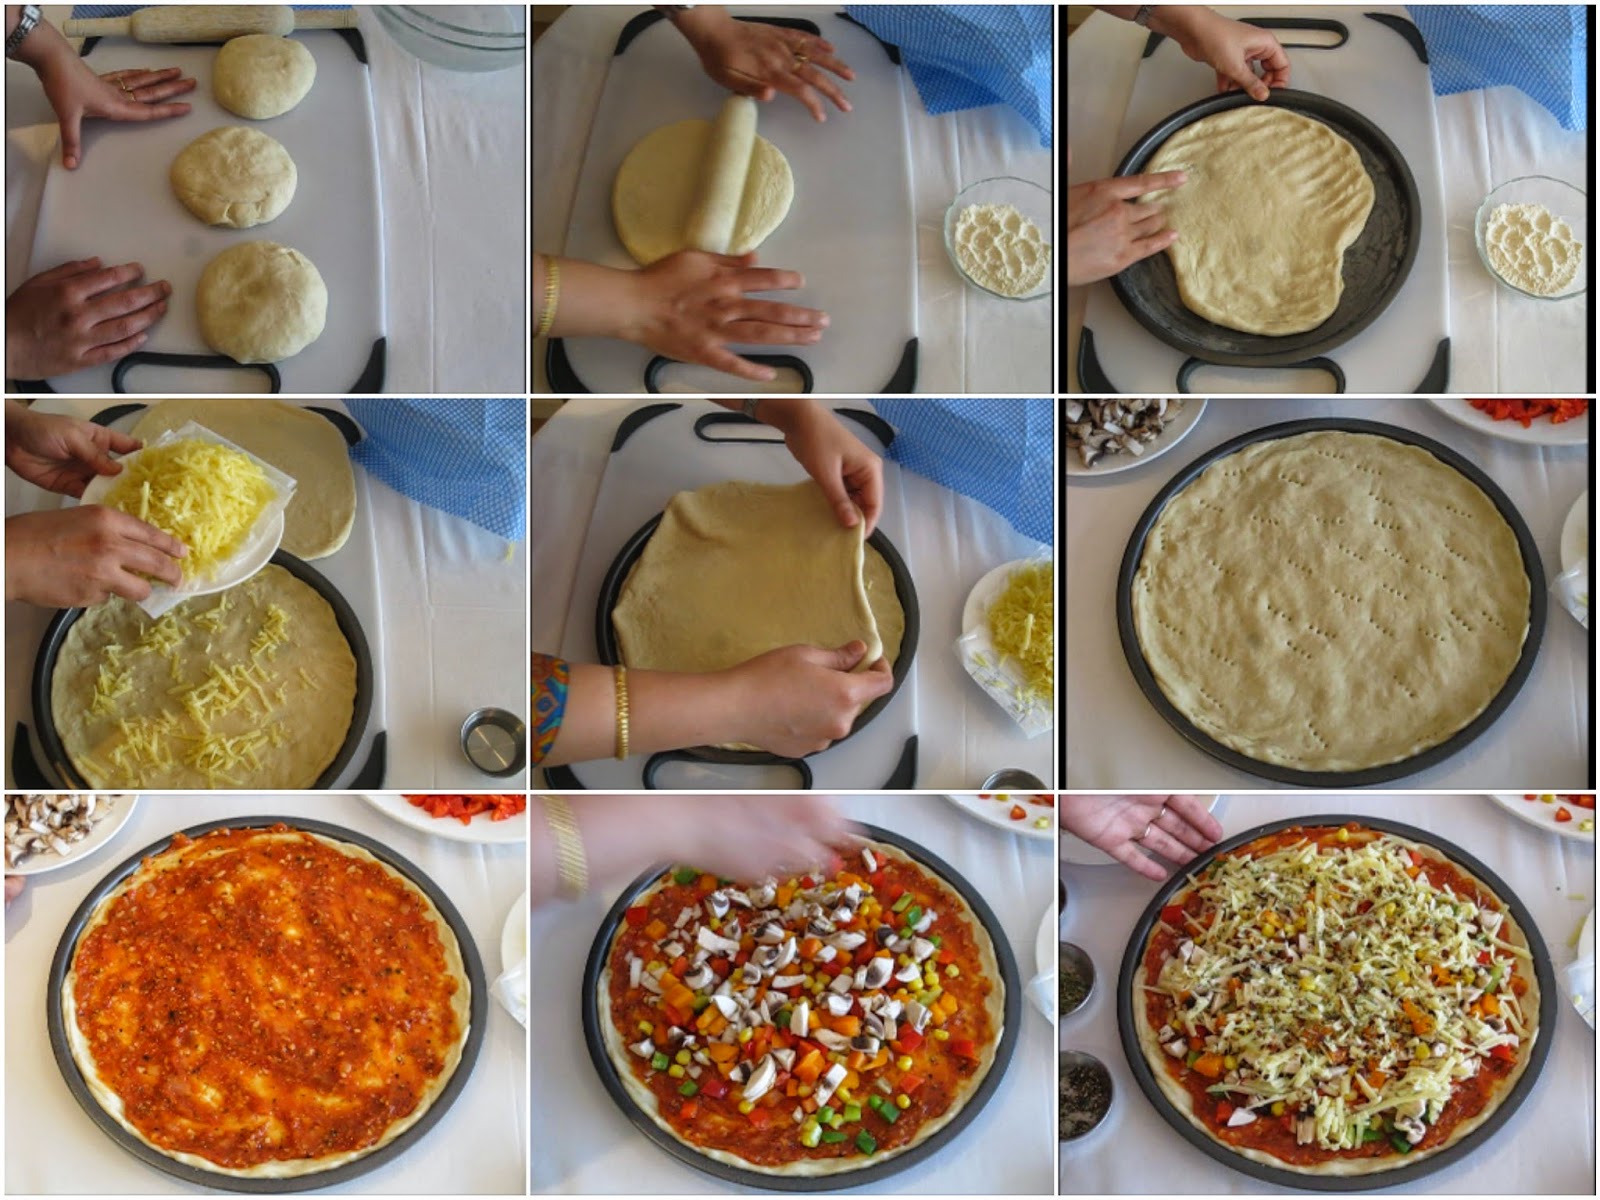
  • Divide the dough into two equal parts
  • Roll both the parts in chapatti shapes and as per the size of the pan. 
  • Place one of the rolled sheet over the pizza tray. (Grease the tray with some olive oil) and dust it with some plain flour or corn meal)
  • Now spread half of the cheese (or as per the choice) over the sheet leaving thinly the edges.
  • Apply little water over the edges with the help of a finger and the place the other sheet over the top and seal it properly.
  • Prick the sheet with a fork (as shown in the picture)
  • Apply pizza sauce generously over the top and add veggies. Garnish with cheese, herbs, chilli flakes and salt & pepper.
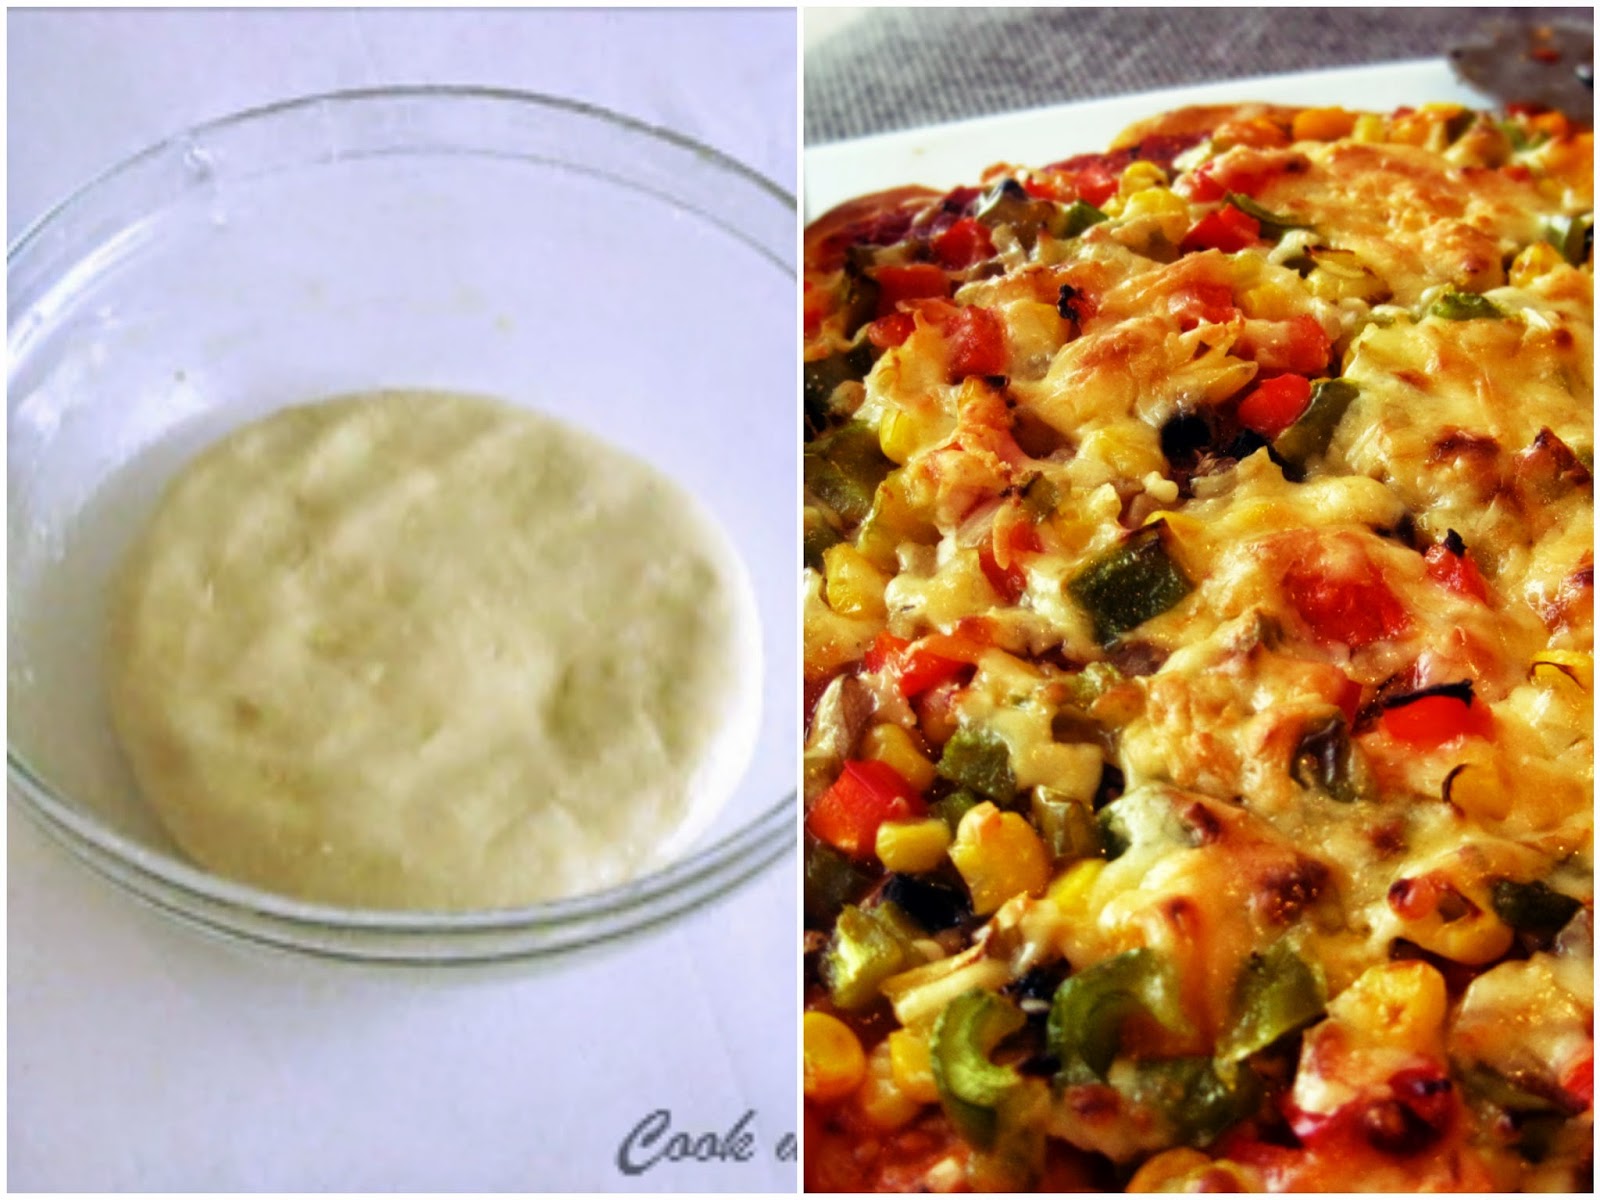
  • Keep it in the oven for 25-30 minutes on the middle rack. If you like the crust to be nice golden brown then you can keep it on broil for 1-1/2 minutes, without moving away from the oven. Enjoy hot!!!! 

Note : Below pictures here are just to give a rough idea. Quantity of the ingredients is totally different.
 

Thanks n Happy Baking
Priyanka :)


Pizza Dough


A very easy to make pizza dough at home. Make pizza or just enjoy a loaf. The dough gives a perfect crust for the pizza. Thin or pan it depends on the choice with this no fail recipe.

Ingredients for the dough:
  • All purpose flour/plain flour (Maida) : 1 cup
  • Dry Active Yeast : 3/4 tsp
  • Milk (luke warm) : 1/2 cup
  • Water (luke warm) : 1/2 cup (quantity will be adjusted as per the dough)
  • Sugar : 1/2 tsp
  • Salt : 1/2 tsp
  • Olive oil/Veg oil : 2 tbsps

Method for preparing the base dough:
Activating Yeast
  • Mix sugar and yeast in Luke warm milk. Cover and keep aside for 10-15 minutes depending on the room temperature. After sometime you will see that the mixture has become very frothy. This is the indication that your yeast is activated.
Kneading the dough :
  • Sieve flour in a big bowl, mix salt to it. Add yeast to it and try to collect all the mixture together and knead a soft dough. At this stage you can add luke warm water as per the dough. The dough need to be very soft and sticky. 
  • Once combined well add oil. 
  • Put the dough on the work surface and knead for 5 minutes. (You can dust it with some flour while kneading)
  • Keep the dough in well greased big bowl and cover with cling film or wet kitchen towel. Keep it in a warm place for 1-1/2 hr or unless the dough is doubled in size. (The best place which I find is oven with the light on).
  • Once the dough is risen, its ready to roll.

Note : Below pictures here are just to give a rough idea. Quantity of the ingredients is totally different.


Thanks n Happy Baking 
Priyanka :)

Homemade Pizza sauce/Italian sauce


Pizza sauce is extremely easy to make and just need very few ingredients. Its fresh and preservative free. The best part is that you can customize the flavors as per your likings. I am preparing this sauce since years and must say its a no fail recipe. So lets quickly run through the ingredients following with the method.

Ingredients :
  • Fresh tomatoes (puried) : 1 cup
  • Concentrated puree : 1 tbsp/Normal Puree : 2 tbsp
  • Tomato Ketchup : 2 tbsp
  • Minced Garlic : 2 tbsp
  • Finely chopped Onions : 1/4 cup
  • Chilli Flakes : 1 tsp
  • Oregano : 1 tsp
  • Basil : 1 tsp
  • Corn flour : 1 1/2 tsp
  • Oil : 1 tbsp
  • Sugar : 1 tbsp
  • Salt to taste
 Method: 
  • Heat oil in a pan, add minced garlic, as soon as the rawness is gone and they are little golden add onions and fry till they become little golden. 
  • Add tomato puree and cook until it becomes thick.
  • Add the concentrated puree with ketchup, herbs, salt, chilli flakes and sugar.
  • Prepare corn flour slurry and mix in the tomato mixture.Cook for 1-2 minutes.
  • Remove from flame and let it cool at room temperature.
Note : Below pictures here are just for the reference (a rough idea). Quantity of the ingredients is totally different.


You can store pizza sauce for 4-5 days in the refrigerator.
Enjoy it with your pizzas, loaf or just with the chapattis as chutney. 
Thanks n Happy cooking
Priyanka :)

Monday 24 March 2014

Paneer Biryani


There is a very common everyday question in mostly every home - "kya banaye?".  Same is the case in my house too. As it was Meatless Monday, so no egg/chicken. Had my home made Paneer in the fridge, so just grabbed it and thought to prepare Paneer Biryani. This is my mother's recipe, being a vegetarian she used to prepare this frequently. She used to follow the entire process of dum. But morning = time constraint. Hence I just modified a bit of the recipe and here is your quick version ready. This biryani is quite easy and simple to cook, though it has a long list of ingredients. But I am pretty sure that nothing can beat the taste. So lets quickly have a look on the ingredients following with the method.

Ingredients
  • Basmati rice : 2 cups 
  • Paneer/Cottage cheese : 300 gms (click here for homemade paneer recipe)
  • Yoghurt/Curd : 2 tbsps
  • Garlic paste : 1 tbsp 
  • Ginger paste : 1 tbsp 
  • Onion : 2 medium 
  • Tomatoes : 2 large 
  • Tomato puree : 2 tbsps 
  • Turmeric powder : 1 tsp 
  • Coriander powder : 2 1/2 tsps
  • Red chili powder : 1 1/2 tsps (adjust as per the hotness)
  • Garam masala powder : 1 1/4 tsp
  • Kasoori Methi (dried fenugreek leaves) : 1 tbsp
  • 1 inch Cinnamon stick
  • Cumin seeds : 1 tsp
  • Star Anise : 1
  • Bay leaves : 2-3
  • Cloves : 4-5
  • Small flower of Mace : 1
  • Black Cardamom : 2 
  • Oil/ghee : 2-3 tbsps (1 tbsp of oil is required while boiling rice) 
  • Lemon juice : 1/2 tsp 
  • Some mint & coriander leaves finely chopped 
  • Salt (as per the taste)
Method
  • Marinate Paneer : Add yoghurt, 1/4 tbsp of ginger and garlic paste, 1/4 tsp of red chili powder, 1/4 tsp of garam masala, lemon juice and a generous pich of salt. Keep it for 1/2 - 1 hour in the refrigerator.
  • Wash basmati rice and soak it for 30 minutes.
  • Boil plenty of water in a big pan, atleast 6 cups. Add salt and 1 tbsp of oil. As soon as boil starts add soaked rice and wait till they are 90% cooked (not completely). Once done let them cool completely. (I made the rice last night, so it was quite easy and less time taking for me in the morning to prepare the biryani)
  • In other pan or wok heat oil/ghee, add all the whole species and sauté till they change their color and you can feel the aroma.
  • Now add the finely sliced onions and fry them till they become golden brown.
  • Add the ginger-garlic paste, once their raw flavor is gone, add ¼ th cup of water and cover with a lid. After 2-3 minutes u will see that your onions are well cooked and have become a paste kind of consistency.
  • Now add finely chopped tomatoes and all the dry spice powder including kasoori methi and cook. After a minute or 2 add tomato puree, salt and fry for 2-3 minutes or unless the tomatoes are well cooked. Then add marinated Paneer & coriander-mint, mix gently and let it cook
  • When masala is done and you can see the separated oil on the sides, add rice and mix gently.
  • Cover and cook on the lowest flame for a minute and your Paneer Biryani is ready.
Serve hot with mint raita/pickled onions.

Note : You can prepare the boiled rice & marinate the Paneer in the night. This makes your task super quick and saves your time.

Thanks & Happy Cooking 
Priyanka :)


Thursday 20 March 2014

Whole wheat, Oats & Honey loaf


We all are very busy in our daily lives, same is in my case even. But the thing which gives me happiness & peace is cooking and baking. These days I am in love with baking breads and I must say specially with oats & honey loaf. Oats and honey is a deadly combination and when all together combined with wheat flour reaches to its peak. Honey provides it a perfect sweetness which very well goes with a spread of jam or butter even. So lets have a quick look on the ingredients and the directions for baking it.


Ingredients:


  • Whole wheat flour : 2 cups
  • Bread or all-purpose flour/Plain Flour : 1 cup
  • Rolled oats : 1cup n a little for topping the loaf
  • Active dry yeast : 2 tsps
  • Water : 1/2 cup
  • Milk : 1/2 cup
  • Honey : 1/4 cup
  • Olive oil : 2 tbsps
  • Salt : 1 tsp

Method:

  • Combine water and milk in a microwave-safe bowl and heat for 30-45 seconds until warm. Add yeast and 1 tbsp of honey and give a slight stir. Let it sit for 15 minutes or until it becomes frothy.
  • In other bowl mix flours, oats, oil, salt and rest of the honey. Now make a well within the flour mixture and pour frothy yeast into it. Try to mix up all together and knead a slightly sticky dough. (If you are using a stand mixer then with a dough hook, knead on medium speed 6 minutes until dough is smooth, elastic and slightly sticky). Now knead the dough by hand  for 10 to 15 minutes on a lightly floured surface. Transfer the dough in greased bowl and cover with a tea towel. 
  • Keep the dough in some warm place and let it rise unless it gets doubled in size. This might take 1-1 1/2 hours depending upon the temperature.
  • When dough is doubled, punch down and again knead for 5 minutes on to a lightly floured surface. Shape it in to a log as per the loaf tin, pinch sides slightly. Transfer to a lightly greased 9-by-5-inch loaf pan. Cover with a tea towel and let rise 30 to 40 minutes or  until dough reaches 1 inch above the pan edges.
  • Apply a little warm honey on the top of the risen loaf with very light hands and sprinkle some oats over it.
  • Preheat oven to 190 degrees C. Bake 40 to 50 minutes, until loaf is deep brown on top and sounds hollow when tapped on the bottom. Remove from loaf pan and transfer to a cooling rack to cool completely. Once completely cooled, then only cut the slices.

TIPS
  • The dough should not be very dry nor it should be too sticky. If you think that it has become too dry while kneading add a couple of tsps of water, if sticky then add a bit of flour.
  • I usually let my dough rise in an oven with its light on. No heating is on.
  • If you see that the crust is becoming darker, then cover it with aluminum foil after 20-25 minutes of baking

Bye n Happy Baking
Priyanka :)

Tuesday 18 March 2014

Mawa Gujia/ Karanji (Baked n Fried)


Does Gujias/Karanjis need any introduction ???? Naaah
But yes for all my western readers I would like to sum it up a bit. Gujia is a sweet dumpling made with plain flour and stuffed with either Mawa/khoya or suji/dryfruits/coconut. Traditionally they are deep fried in ghee or oil, but this time I tried for some baked ones also. Believe me they taste as good as the fried ones and a bit healthy at the same time :). The sugar gets little caramelized and taste amazingly good. So here is the recipe for Mawa Gujia.
For homemade mawa recipe click here.

Ingredients for the outer covering :
  • Plain flour (maida) : 2 cups 
  • Ghee/clarified butter : 4 tbsps 
  • Milk : 1/4 cup

Ingredients for the stuffing :
  • Khoya/mawa : 250 gms
  • Roasted suji : 2 tbsps
  • Dessicated coconut : 4 tbsps
  • Raisins : as per the taste
  • Chopped Cashew nuts + Almonds : as per the taste
  • Green cardamom powder : 1/2 tsp
  • Powdered sugar : 250 gms (adjust as per the taste)  

Method :

  • For the covering, sieve flour and rub in ghee, till it becomes of a kind of bread crumbs. Add milk and knead into a stiff dough (If needed add more/less milk). Cover it with a moist cloth and keep aside to rest for half an hour.
  • For stuffing, roast khoya in a pan until it turns light brown and sweats ghee. Then remove it from the flame, transfer to a bowl and let it cool down completely. 
  • When completely cooled add sugar, dry fruits, cardamom powder, suji, coconut and mix well. (If sugar is added when the mawa is still warm, then sugar will melt and make it liquidy) 
  • Divide dough into small balls. Roll out dough balls into small puris (not very thick nor very thin) of appx 4-4.5 inches diameter, then place the puri in the cutter and put 2 tbsp of mava mix, apply little water with fingertips on the edges and then close the cutter and press. Remove the extra dough. This will seal the gujia. Now carefully take it out and place on a oil smeared plate. Keep the gujias covered with kitchen towel. Repeat the same procedure with the rest of dough balls.
  • If you do not have a gujia mould then roll out puris in proper round shape. Place stuffing on one half, lightly dampen edges and fold the other half over the stuffing and press edges firmly using a fork.

For Frying :
  • Deep fry gujias in a wok/pan with oil/ghee. Keep the flame on med to low while frying. Once turned into golden brown color drain and place on an absorbent paper. Serve hot.
For Baking :
  • Bake the gujias in a preheated oven at 180 degree C, for 40-45 (minutes depends on the oven). Do apply some milk with a brush on the gujias before baking. This will keep the shining.

Once the gujias are completely cooled, keep them in an air tight container and eat them till a week or unless finished :) 

Bye n Happy Cooking
Priyanka :)